- Home
- Apply for a Japanese Class (JAC Members)
Manual
2024/03/12
Apply for a Japanese Class (JAC Members)
You can apply for a Japanese class with "JAC Members" app.
Flow to apply for a Japanese class
Follow the below flow to apply for a Japanese class with "JAC Members" app.

If one of the following two conditions is true of you, you can apply for the Japanese class.
-
1. Foreign national with "Specified Skills (i)" Status of Residence who works with the construction company
*The company must have paid the acceptance fee for the foreign national who will attend the seminar or event.
-
2. Technical Intern Trainee who works with the company the foreign national of above (1) is working with, and who will promote to the specified skills (i)
*The company must have paid the acceptance fee for all of the foreign nationals who belong to it.
Step1.
Open "Events List"
1-1. Open "Events List"
On the home screen of JAC Member app, tap "Event" in the menu bar at the bottom.
"Events List" will open.


1-2. Filter the events with a category
You can filter the events with a category to display.
<How to filter it>
1. Tap the "Category" at the top.
2. Choose one of the category you like to display.


1-3. Filter the events with a tag
You can also filter the events with a tag to display.
<How to filter it>
Tap one tag such as "online", "easy".


Step2.
Confirm the details of the event
2-1. Open "Event Details"
Tap [Details and applying are here.] of the event you want to see the details.
"Event Details" will open.


2-2. Confirm the details of the event
If you scrol the screen, you can see the event details.
If you tap [Display on the browser], you can see the same content on the browser of your smartphone.


Step3.
Apply for the event
3-1. Display "Apply for event"
On "Event Details", tap [Apply] button.
When "Check the application conditions" will be opened, tap [Apply].
* Only for the available events to apply, [Apply] button will be displayed.

* You can only apply for the events whose status is "On Applying".

*The deadline has already passed.
*The application has not started yet.
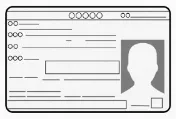
3-2. Take pictures of the residence card
Tap the  icon in the "Take photos of Residence Card" area. Read the explanation on the screen carefully. Take three photos (A to C) using your smartphone. Position the card within the frame.
 A. Front of ID showing your face
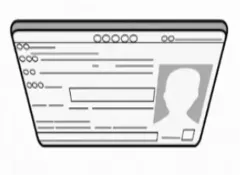 B. Angled photo showing card thickness and your face
 C. Back of ID (side without face)
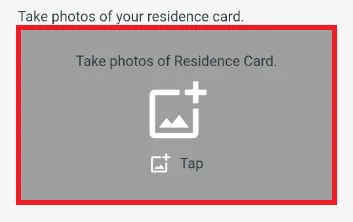
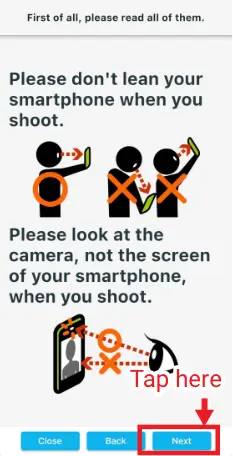
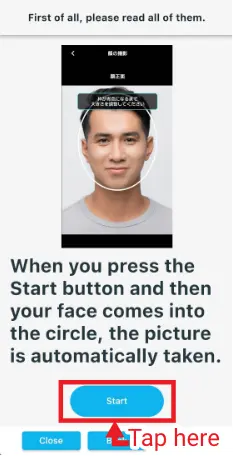
3-3. Take a photo of your face
Tap the ![]() icon in the "Take photos of your face" area. An explanation of important points will appear. Please read the explanation carefully. Tap the [Start] button to take a photo.
icon in the "Take photos of your face" area. An explanation of important points will appear. Please read the explanation carefully. Tap the [Start] button to take a photo.
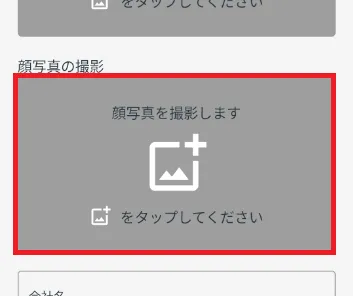
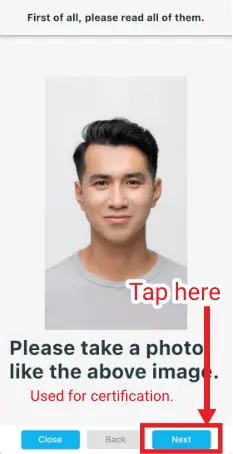
On the "Check your face photo" screen, check "I checked that my photo was clear". Tap the [OK] button. Then you can register the photo.
(Applications may not be approved if the photo is not taken properly.)
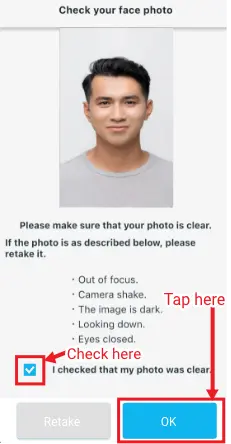
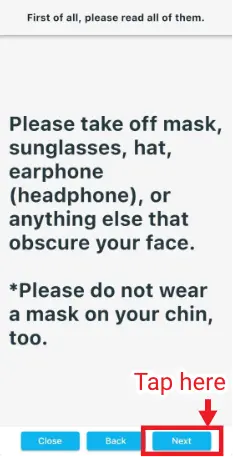
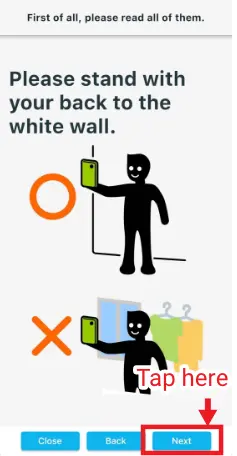
(Photos cannot be accepted if any of the following apply.)

Bad photo image.

Wearing masks, earphones, sunglasses, etc.Glasses are OK.

Wearing a mask on your chin.

Wearing a hat or helmet.

Out of focus.

Photos are taken without clothing.

Take a photo of your face in the dark.

People or things are reflected in the background.

Face is turned sideways.

Please take a photo that clearly shows your face.
3-4. Enter the other information
Enter your phone number, like your smartphone number or the number to easily contact you.
Choose your prefecture.
Enter your address before the prefecture.
(ex: 201 Maison Shinagawa, 1-1-2, Minato-ku)
Enter the name of the company with which you are working.
Select the prefecture your company is in.
Enter the address of the company.
(ex: 2-5, Shibaura, Minato-ku)
Select the course you want to take.
If you want to receive the information from JAC in future,
→ Choose "Yes, you may.".
If you don't want to receive the information from JAC in future,
→ Choose "No, you may not.".

3-5. Display confirmation screen
Tap [Next] to open the confirmation screen.


3-6. Confirm what you entered
Scroll down the screen, confirm what you entered.
If all of them are correct, tap [Apply].
If you want to change it, tap [Back].
When the application is properly processed, returns to [Events List].
The label for the event you applied will change from "Unapplied" to "On Accepting" on the upper right.
(* You have not completed your application yet.)


Step4.
Complete the event application
4-1. Complete the event application
When JAC will approve your application, the label of the event you applied will be change from "On Accepting" to !Accepted."
It might some time to approve the application.
Your Japanese class application is completed.

* If the event application is rejected, follow the "Step6. Reapply for the event" flow to reapply.

*Completed the event application
*Rejected the event application
4-2. Confirm the content you applied
You can confirm the content you applied.
Tap [Confirm your application.] of the event you applied.
The content will display.
When you tap [Close], returns to "Events List".


Step5.
Cancel the applied event
5-1. Cancel the applied event
You can cancel the applied event.
(You can cancel either event with "On Accepting" or "Accepted".)
Tap [Cancel] of the event you applied.

5-2. Cancel the applied event
When [Check cancellation] dialog will display, tap [Cancel] in it.
The label for the event you applied will return to [Unapplied] on the upper right.


Step6.
Reapply for the event
6-1. Confirm the rejection reason
In the rejected event, tap [Check Messages].
When message will open, read why your application was rejected.


6-2. Reapply for the event
In "Message Details", tap [Reapply].
"Apply For Event" will open.
Follow the same flow from "3-2. Take a photo of your ID card" to enter your information, and then reapply.


Frequently Asked Questions (FAQ)
- I want to install the "JAC Members" app. Where can I get it?
- I forgot my registered password for "JAC Members".
- I forgot my registered email address for "JAC Members".
- I made my smartphone new. Can I use it as is?
- How can I send messages from "JAC Members"?
- I have changed my smartphone but do not have a passport. How can I make a Device Information Change Request?
- How can I delete my account?
- How can I receive a pass certificate for the exam I took outside of Japan?
- How can I get a certificate of passing the exam I took in Japan?
Users' Manual
for JAC Members App
When you have some questions to use the app, please refer to the manual.
Account Registration and Basic Operations
Find a Japanese company (The recruitment information for residents out of Japan bulletin board)
Apply for A Pass Certificate
Apply for events